

[wp_ad_camp_2]
Basic Earth Science Projects For Kids
How to make a volcano? Hurl cosmic material into space, have it collect into a planet sized object (like earth for example), put it in orbit around a sun, give it a few million years for the surface to cool to a hard crust, and poof – you have the basic ingredients needed. If hot molten magma under great pressure then manages to escape through weak spots in that crust, we have a volcano.
It’s a truly fascinating subject, and this project attempts to frame the question of how to make a volcano within that larger context of basic earth science. The topic area is rich enough to support projects at all grade levels, but this experiment is listed as a 3rd grade science project since I believe it is the first age group that can perform the steps needed with very little supervision.
Under the right circumstances, it could also be used as a 4th grade science project, or possibly even as late as 5th grade. However, I actually performed this volcano project with two youngsters, one in pre-school and the other a kindergarten student. Granted, I was always there, and they won’t get the larger part of the earth science equation yet, but they (and I) had a great time from start to finish.
Since our goal is to help young students tie this exercise to the larger earth science topic, additional earth science projects will be added in solar power, earthquake, tsunami, hydro energy, wind power and other related areas as time allows.
But first – let’s answer the question on how to make a volcano using things we probably have around the house. It’s a fun science project that can be done several ways. Here is the first: papier-mâché (forever to be known here as paper-mache).
Objective
The “how to make a volcano” science project is designed to help young students learn more about earth science by looking specifically at volcanoes. We’ll also learn how common household items can be used to build useful models, with an element of creativity required to make the model realistic. Hopefully we’ll discover a few new science terms along the way as well. The experiment is done in two steps. First, we figure out how to make a volcano, then we look at fun ways to make it erupt.
Materials needed Make a Volcano with Paper-Mache
– 1 newspaper
– 1-2 cups flour, depending on the volcano size desired
– 1-2 cups water
– 1 medium size bowl
– 1 fork or spoon to stir with
– 1 pair of scissors
– 1 roll scotch or masking tape
– 1 small plastic bag
– 1 pencil or marker
– 1 plastic or glass bottle
– 1 medium size box
– Paint
– 1 medium size paint brush, (a couple more if you have several helpers)
– Rocks, sticks, tips of pine trees or shrubs and anything else you would like to use to decorate the volcano with to make it more realistic.
Some notes on the above materials. First, just about any drink bottle will work, but keep in mind that bottle size will determine volcano height. That’s why the amount of flour and water is shown as variable. Second, having sides around the volcano helps keep the “lava” in part 2 of the project contained. However, if having sides is not desired, then substitute a flat piece of cardboard, or even some thin plywood for the box as a stable base for the model volcano. Finally, any paint will do, but a water based acrylic is recommended for easy clean up. They also dry quickly with little need to vent paint fumes. Green, blue, yellow, red, white and black or brown should provide plenty of variety. We cut the bottom out of a small Styrofoam glass to use for mixing colors and dispensing the paint.
Preparation
Other than gathering the materials, no advance preparation to make a volcano is needed.
Project Day
If done as a demonstration for 2nd, 1st grade or even kindergarten science projects, then a single set of materials is all that’s needed. Gather the students around, let them take turns helping as time allows and follow the directions shown below. It will take at least one class period for them to make a volcano with paper-mache, another to paint and a third to add final decorations and make it erupt. At least one full day will be needed between these steps to allow for drying time.
If done as an in-class 3rd grade science project, split the class into smaller groups as materials allow. It will still take the same amount of time to complete the project, but in this scenario, each group of students gets to make a volcano of their own. Then they can decorate it and decide what to use as simulated lava to make it erupt.
As a final comment, a “facts about volcanoes” page will be added soon as a ready reference for information on how things work in real volcanoes. While the paper-mache volcano project was designed to be a fun science project for kids, the volcano information sheet will help tie it all together to the earth science topic.
Project Steps
Step1 – Get a medium size box and mark where you want to cut the sides.
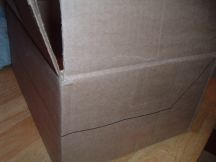
Step 2 – Cut the box, but do not discard the sides. Place the bottle in the box and draw a circle around its base big enough for the bottle to slip through.
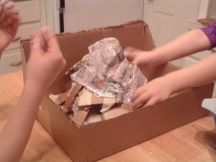
Step 3 – Cut the box sides into about 1 inch strips. Yup, those are my lab rats!

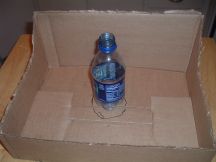
Step 4 – Cut the hole and make sure the box fits over the bottle.

Step 5 – Cover the bottle with a small plastic bag to keep building materials from sticking to the side of the bottle.
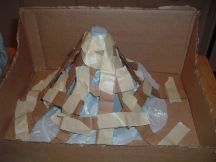
Make a volcano structure around the bottle with 1 inch cardboard strips that were left over from the cutoff sides of the box. Staples can be used to hold the strips together if desired, but be sure to put plenty of tape around the crater of the volcano, and make sure not to cover the top of the bottle up.
If you prefer a stronger structure, chicken wire does great … but you’ll need to supervise that, (and it really isn’t needed).
Step 6 – Mix about a cup of flour with enough water to make homemade paste. It should be about the consistency of elmers glue.
Cut or tear several dozen 1 inch strips of newspaper, but leave at least a sheet or two to put under the box to make the cleanup part easy.
Holding one end of a newspaper strip, drag it through the paste and gently squeegee off any excess glue with fingers on your other hand. The goal is for the paper to be wet, but not dripping with glue.
Add each glue-soaked strip of newspaper to the volcano support structure, gently smoothing each down as you go. If the forming mountainsides get too much glue on them (you’ll know), just add some dry strips to soak it up.
Step 7 – Continue until there are several layers of newspaper strips over the entire mountain, and on the bottom of the box.
If you picked a larger bottle, you may need to mix more paste and cut more paper strips to get to this point, but when done, it is time to clean up for the day and let the model volcano dry.

Step 8 – Add some paint for effect. Green makes a great start for grass, trees, etc – and if the volcano is tall, only rocks can be seen near the top. We used brown for that. Sky is blue … etc. Paint the volcano to make it as realistic as you can.
You can go to the next step if desired, but it would be best to let the paint dry first if you can afford the time.
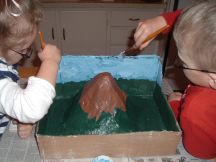
Step 9 – Now decorate the volcano to make it look even more realistic. Add rocks, sticks for fallen tree-trunks, bushes, maybe even houses from a monopoly set, etc. (Then discuss why it might not be a good idea to live near a volcano).

That takes care of how to build a volcano using paper-mache. It’s a bit messy, but easy enough to do. I don’t think we’ll need to explore these here, but several other construction methods you might want to ask the students to do might include …
Moist soil
Sand
Homemade play-dough
Clay
And possibly a couple others they come up with on their own. Let the imagination run wild … as they say. Let them be creative!
In the meantime, part 2 of any volcano-making project just has to be about making it erupt. And that’s next!
[wp_ad_camp_1]
Making The Eruption
There are many recipes for volcanic eruptions using baking soda and vinegar, and different reasons to use each of the ingredients. There are a couple other chemical recipes I’m not going to add for safety reasons, but diet coke and mentos is sure fun. It is rather dramatic, very messy, and therefore quite popular! Bring plenty of paper towels, but the kids love it. Did I say messy?
Anyway, you decide which simulated volcanic eruption you would like to try. They are all fun, and if you are doing it as an in-class project, perhaps assigning a different one to each group to see which is more realistic would be fun. Here are the links for part 2 for how to make a volcano erupt. Enjoy!
Baking Soda and Vinegar methods
Diet Coke and Mentos
Salt!
What just happened?
For the teacher
Hopefully, everybody had a great time. But also hidden in the project was some learning on how to make a volcano out of common household items. This may not sound like a major event, but modeling what we see in nature so that we may attempt to better understand it under conditions we can control is part of the scientific process at its most fundamental level. Making a small-scale model volcano, and figuring out to simulate volcano eruptions may be a fun way to do science … but science it is.
Do be sure to discuss some of the items on the volcano information sheet (coming soon), or better yet, provide a copy to the students to review during the project. If there are more than 2 or 3 to a group, this is a great way to focus on learning more about volcanoes during times when they cannot directly participate. When introducing the project, ask them if they can figure out where magma comes from, how it gets to the surface and what happens when it does. That should bring up a number of new earth science terms for discussion as well.
We’ll cover what causes the simulated volcanic eruptions in part 2’s project discussions.
For the students
At this grade level, we won’t assume T-shirts will go by the way of lab coats, and each of them striving to become the next Nobel prize winning scientists. Having fun while learning some basic skills in scientific discovery is plenty at this point. Reading the volcano information sheet (or doing a report on their own) should provide more than enough information on volcanoes, as well as a fun introduction to basic earth science.
Once the model volcano is built (and the paper-mache mess is cleaned up), summarize this part of the earth science project with a few facts about volcanoes. Answering the above questions about magma as a group is also a great lead in for part 2 – making the volcano erupt.
For the Teacher (with less mess)
You can find several volcano kits on Amazon that are pretty much out of the box ready to go. Enjoy!!


As an additional resource and fascinating reading on real eruptions, we recommend: Eruptions that Shook the World. It is a Spellbinding exploration of the history’s greatest volcanic events and their impacts on the history of humankind.
[wp_ad_camp_2]
I might try this thanks
… and we hope you do! Enjoy!!
IT ACTUALLY WORKS THANKS WOW CAN YOU DO IT BY FOLDING UP CARD BOARD AND STICKING IT TO A BOTTLE
Yup … that’s an option as well. Enjoy!
This was brilliant in lockdown! Thank you
Thanks Kate!