[wp_ad_camp_2]
Making a lemon battery is one of the classic science projects for kids. It is inexpensive, easy to set up and fairly easy to perform.
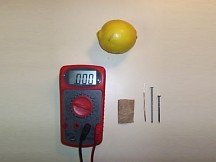
If you take a quick peek at the supplies photo below, you’ll see we need a voltmeter. Don’t let that scare you. A fruit battery doesn’t generate enough power to actually light a bulb, so a meter is needed to see the effect. That’s why I believe this is better suited as a 5th grade science project, if done by itself. However, nothing is hard and fast here. If you want to combine this with the “Turning on a Light Bulb” experiment to bridge the gap between lighting a bulb and seeing the meter move, it could be made to fit elementary science projects from about first grade on.
Enough of the intro stuff … let’s create a lemon battery – and then try to figure out how it works. Have fun!
Objective
What could be more everyday than a lemon, a couple of nails and some wire? Well, that’s all you need to make a lemon battery. As is the case with most science projects on this site, the goal here is to learn by using stuff we see around us in everyday life.
We will learn a bit more about electricity, possibly some new science terms, and if this project is done with the first grade “Light Bulb” experiment, we can tie a familiar flashlight operation to the more abstract concept of a meter reading.

Materials
– 1 medium size lemon or lime
– About 4 in. wire with insulation
removed, #12 or #18 works just fine
– 1 steel nail, #6 or 8 is ok
– 1 zinc plated nail, #6 or 8 is ok
– Small piece of sand paper
– Knife or wire pliers (not shown) to
remove insulation
– A voltmeter that can read tenths of a volt, but nothing fancy beyond that.
Preparation
The lemon battery project requires almost no advance setup. Just gather the above material, strip the insulation off the wire and use the sand paper on the wire and nail ends just before performing the experiment.
Project Day
Break the class into equal groups according to the number material sets you have available. If you are tying this to the battery light project, now is a good time to use the wire, flashlight bulb and battery to show how they are used to light the bulb itself. Tell them we will see if we can make the lemon into a battery like the one you are holding to light the bulb.

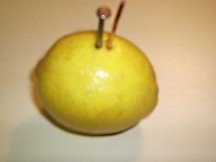
Order does not matter, but I selected a steel nail and copper wire to start with. They are our battery terminals. Lightly sand the end of the wire and nail. Without letting any part of the nail touch the wire, insert both ‘terminals’ in the lemon about 1 to 1 1/2 inches deep and as close together as you can get them.
Note – if they touch, our battery will be ‘shorted’ and no voltage difference will be shown on the meter. If that happens, just pick a new spot on the lemon and try again.
Turn the voltmeter on to a DC volt setting. If you have a battery handy (AAA, AA, C or D is fine), use it to show the class that the meter is really working. The meter will show 1.2 to 1.5 volts if new, depending on which you size you used, and possibly less if it is an old one. Let them know that it is this voltage difference that makes the light bulb in a flashlight come on, as well as the lights inside a car, or their car’s headlights at night when they need them.
Note – if the meter shows a minus sign “-” in front of the number, just switch the meter leads (black and red wires) around so that the black wire touches the other end of the battery.

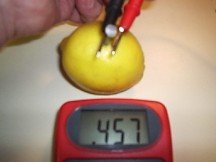
Go ahead and touch one of the meter leads to the nail and the other to the wire. What happens? The reading you see may be different from one lemon to another, and from one trial to the next. This is because the voltage difference we see depends on how far apart the terminals are, how well we make contact with the meter leads, how much and how strong the juice (our Electrolyte) is in each lemon, as well as other things that we cannot easily control in this experiment.
The important thing to note is that there is definitely a voltage difference.

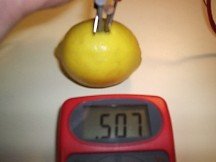
Replace the copper wire with the zinc nail. Touch a meter lead to each nail as shown in the photo. What happened with the lemon battery this time? Same voltage? Higher? Lower?
This time replace the steel nail with the copper wire. Zinc and Copper make great battery terminals. Can you see why?
If there is time, replace the lemon with an apple or a potato and repeat. The links will take you to that experiment if you would like to review how it relates to the lemon battery first.
If you demonstrated the experiment, try to give the students some time to do the lemon battery project themselves. Have them put the black and red leads directly together to show them nothing happens if there is no space between the meter wires. Have them pull the meter leads apart ever so slightly. That will show them nothing happens by itself even if the leads are very close together, but not in the lemon. Have them stick each lead directly into the lemon, close or far apart. That will show them nothing happens that way either. It only works when you have two different materials, close together but not touching in the lemon. But if you have the right two materials, it sure works then.
As a group, let them know the same thing that causes the light in a flashlight to come on is what causes the meter to move. If you decided to do the two projects together, go ahead and reinforce that by turning the light on again. You can even use the volt meter to show how the needle moves when you connect it to a “real” battery.
Then ask what they think would happen if you could hook up a light to the lemon instead of the battery. Now is your chance to let them know a bit about some basic electricity, a few science terms and perhaps even answer a few science questions about how things work.
What just happened?
For the teacher – as noted in Electricity Science Projects related to Charge, a lemon battery provides a potential difference much like in a car battery. Two dissimilar metals are immersed in the lemon’s juice, which acts as the electrolyte. The wire and nails act as the cathode (+ terminal) and anode (- terminal), and similar chemical reactions take place when the voltmeter is hooked up. Ions flow through the electrolyte and electrons flow through the wire.
If the terminals in our experiment are not connected to the meter, no voltage potential can be read. Likewise, if the two metals in the lemon are the same, the chemical reactions do not occur, no ions flow in the electrolyte and no voltage potential is generated … in other words, nothing happens. If we do use the right metals for our terminals, and we connect the voltmeter as shown in the above photos, we will get a voltage reading.
One question may remain … why can’t we turn a light bulb on with this battery? The answer is, even if we connected several lemon batteries together (in series) to get the same voltage as in a D cell battery, the current we can get out of a lemon battery is just too small to light the bulb. But it is fun to try!
For the students – as long as we have the right metals in the lemon, and we connect the voltmeter to each of those metals (battery terminals), we will read a voltage on the meter.
Summarize by letting them know – even though the voltage we see is small and our lemon battery just isn’t not strong enough to turn on a light by itself, it is the same thing that happens in a flashlight.
After the fruit battery series, try the Coin battery project. It’s pretty fun too.
And if you just want something you can pull off the shelf for quick demonstrations, these should help:
Here is another battery project you may want to have fun making: https://how-things-work-science-projects.com/potato-battery/


So Cool it helped me!!!
Glad you liked it Keinza!
Dave can you help me please i am a 6th grader and i have to do a science fair project and i need a source so can you tell me things about it like a list of keywords that i can use to guide my topic research that are related to my scientific question,independent (test) variable,dependent (outcome) variable,and controlled variables please that will help me so much you seem like such a reliable source thank you so much.
Hi Yomara
Thanks for the question! How about sending me a note about some things that interest you on the “contact us” form and I’ll do my best to help.
Why would this experiment not work with two of the same metal?
Hi David
Good question, and if you go back up to the “what just happened” section you’ll see that I tried to answer it there. You need two different metals to set up something called a potential difference so that ions will flow from one of the metal “terminals” to the other through the conducting solution called an electrolyte. Without that, you just have a lemon with two of the same nails in it. You can read more about this on the Electricity Science page
Wow, you had a cool project, Dave. But can I ask you? Do you have references on this because I just want to read the references you referred on your project.
Thanks Divine. Any references I put in the article are for other pages on this site that might be helpful in understanding (or are similar experiments) to this one. If you want outside references I recommend Googling “lemon battery” . You will find there are many ways to do this classic experiment, and well as many ways to explain why it works. Hope that helps!
Dave, how much money did you spend on this project? Did you spend lesser than $100?
Hi Laura
Yes, way less than $100. But think I had everything on hand. The only thing that would cost much is the voltmeter, and those can be found at home depot, menards, Lowes or even your local hardware store for about $9 – $20, depending on the features you buy. (I think mine cost about $12 at the time). The nails are a few $ a box if you don’t have any and even though I used wire I had on the shelf, a small roll of it is only a few $ as well. … and the lemon (or lime or potato, etc) is pretty cheap at your local grocery store.
Hope that helps!
dont you have to roll and shake the lemon for the lemon to become juicy?
Thanks Kara – I actually did roll the lemon a bit out of habit, but you don’t really have to. (This experiment works with a potato, apple or other fruit without “juicing” juicing them up first as examples). But … to see how much it changes the result, I recommend taking 2 lemons from the same batch or bag, roll one and not the other then do the experiment. Log your results. Happy experimenting!