
[wp_ad_camp_2]
More fun with electricity for kids!
A coin battery is similar to fruit battery experiments, except that the fruit’s part is replaced by a small amount of salt water. It’s an easy science project to do, especially if a project like the lemon battery has already been performed.
Project supplies are plentiful and you can actually light an LED in this experiment if you stack enough coins together – – – but you have to get the right LED and making it work can be a bit tricky. So we’ll use a voltmeter to show the effect with the coin battery here. This is listed as a 5th grade science project, but if demonstrated along with the “Turning on a Light Bulb” experiment, it can be used in electricity experiments, or elementary science projects from about the first grade on.
How to create a coin battery …
Objective
To learn more about how electricity works.
The coin battery is designed as a stand-alone project, but if the “Light Bulb” experiment is performed at the same time, that can help connect what’s happening on the voltmeter’s display to lighting the bulb in a flashlight.

Materials
For each coin battery station, you’ll need:
– A small glass or bowl
– Salt
– Spoon or stir stick
– Thick paper towel, blotter paper or even cloth
– Scissors
– About 6 each, pennies, nickels, dimes and quarters
– Small piece of sand paper
– A voltmeter that can read at least tenths of a volt
– Small battery, AA or AAA is fine
– Optional LED
Preparation
The only preparation needed for the coin battery project is to gather the materials.
Project Day
Split into groups as materials allow.
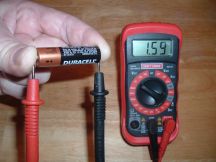
Use the AA battery as shown in the photo to the left to verify you have the meter set up correctly.
If the light bulb project is being performed at the same time as the coin battery, this is the perfect time to show how the battery can be used to make the flashlight bulb light up. Let the students know that if the meter moves using coins and salt water, then they must be acting like a ‘real’ battery as well.
Add a small amount of water in the glass or bowl. 1/4 cup should do just fine. Mix in enough salt such that a few grains no longer dissolve after stirring.
Cut about 8 – 10 pieces of the paper towel or soft cloth into sections that are just big enough to cover a nickel but do not hang over the side. To prevent problems, it is best to use the smaller coin, trace it out on the paper and cut the circles out with scissors. When done, place them in the salt water solution so that you can get them back out one at a time.

Lay out 6 nickels and place one piece of the salt-water soaked paper on each. Be sure that the paper covers the whole nickel, but don’t let it drape over the side. Lay a penny on top of each paper. Be sure the penny touches only the paper or it won’t work well. Each of the penny-paper-nickel stacks becomes an individual coin battery cell.
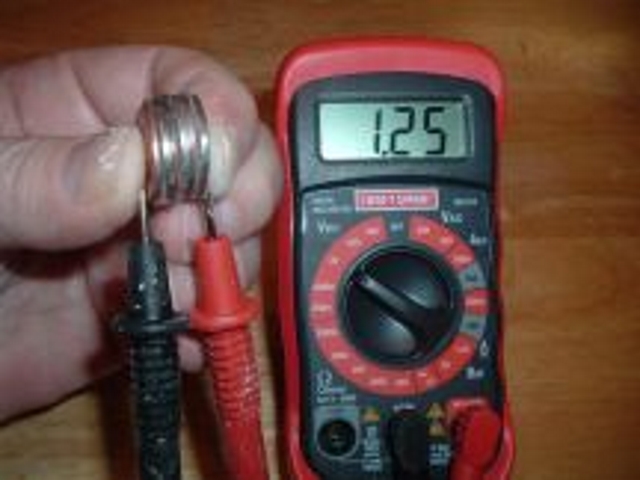
Turn the voltmeter on to a DC Voltage setting that shows at least one, and if possible, two or more decimal points as shown in the photo. Test each coin battery cell to make sure it is working as a small battery by putting one lead on the nickel and the other on the penny. You should see somewhere between .25 and .50 volts DC depending on how well that cell is working.
After each nickel/paper/penny cell is tested, set it on top of the previous cell. For example, after two cells are tested, you should have a nickel, paper, penny then another nickel, paper, penny. After three cells, you will have a nickel, paper, penny (no paper), nickel, paper, penny, (no paper), nickel, paper, penny … and so on. After stacking each new cell, put one of the voltmeter leads on the bottom nickel and the other on the top penny. With each new added cell, you should see a total voltage that is about the same as adding up what you measured for each individual cell that is now in the stack.

With 5 or 6 cells, the voltmeter should read at least 1.5 – 2.5 volts DC. As can be seen by the photo on the below left, 1.25 Volts were achieved with just 3 cells connected together. After about 3 cells, it gets hard to hold them all together without shorting out the battery. It is easier to build the coin stack on the table and use the points the meter leads to touch the bottom and top coins.

If you would like to take this one more step, 1.4V is enough to light a low voltage LED. You’ll have to be sure the current provided by the coin battery falls in spec with the LED, but give it a try! It’s well worth the effort if you can afford the time.
Try the other coins to see what happens. Make the paper or cloth big enough to cover most of the larger coin, but be careful not to let it fall over the side. You should see that some coin combinations make better batteries than others.
Be sure the students see that if the meter leads are held apart, touched together, or even put in the salt water by them self, nothing happens. Two dissimilar metals are needed to act as the battery terminals, and without them, no voltage is generated.
Troubleshooting
If you have trouble getting good readings, make sure that the paper does not drape over the side so that it touches other coins. That shorts the battery and little or no voltage will be displayed on the meter. If the water isn’t salty enough, it will not act as a good electrolyte. That means only a few ions will move from one coin to the other and you will have low voltage readings. If you put paper between the individual cells (see above for the correct stacking order), poor if any voltage will be generated.
Those are the most common problems, but if all that seems to be ok and the meter still won’t read, try lightly sanding the coin surfaces with a small piece of sand paper. That should fix it.
What just happened?
For the teacher – except for salt water replacing the fruit, most concepts and “how it works” explanations are the same here as in the fruit battery projects. Please see the lemon battery experiment for a complete explanation of what’s happening in the coin battery. Additional information is also discussed in the Electricity Science Projects related to Charge section of the electricity page.
Where this experiment differs from fruit battery projects is that we connect several batteries together in series to get enough voltage to light an LED. That means we connect the (+) terminal of one battery to the (-) terminal of another.
It is also why we do not put the salt-water soaked paper between individual battery cells. If you look closely, you’ll see doing that connects a zinc-copper battery to a copper-zinc battery. In other words, if you use the wet paper between cells, you will have a (-) nickel terminal connected to a (+) copper terminal, then the same (+) copper terminal is immediately connected to a different (-) nickel terminal when you put the next nickel on the stack. You can think of this as positive voltage going one way, but being immediately cancelled out by negative voltage going the other way. The net effect is no total voltage.
By leaving the wet paper (electrolyte) off between each individual battery cell, there is no electrolyte to force copper and zinc ions to flow. Only free charge will flow from one cell to another through the metal-to-metal contact. When more than one battery cell is included, the voltage increase becomes additive, and you see the effect we saw during the experiment.
This was first performed by Alessandro Volta in something he called a voltaic pile way back in 1800. He used alternating copper and zinc or silver and zinc discs that were separated by cardboard or cloth soaked in salt water, just like we did above. Since some metals have more free electrons to give up or accept in ionic form than others, some dissimilar metal combinations work better as batteries than others. If you tried different coins above, you should have seen that effect. If you tried two of the same coins together, penny – paper – penny for example, you would also see that coins with the same metal in them will not give you a battery at all.
If you wanted to go back and connect several potato, lemon or apple batteries together in series like we just did with the coins, you can see the same additive effect with the voltages. It does not matter what generates the voltage, it only matters that you connect them in series correctly to see the effect. In fact, you could make one battery from each of the above, connect them in series, and you should see a final overall voltage that is very close to the sum of each individual battery cell in the group.
For the students – as long as we choose the right coins for our terminals, and are careful about how we connect them together, we can turn pocket change into a battery.
Summarize by telling the group – each individual coin battery, one penny, one piece of salt water soaked paper and one nickel for example, is too small to light a bulb on its own, but it is still the same process that happens in a battery you buy at the store. We also learned that if we connect enough of the coin batteries together in the right way, we really can turn on a light bulb. It is the same thing that happens in a flashlight, and is especially like the battery in your mom or dad’s car.
Here is a project for those just beginning to learn about how batteries and electricity works: https://how-things-work-science-projects.com/battery-light-project/
Hi my name is Camron.
You have a very good article and I would like to use it as a source reference.
Could you let me know the work sited for the “Coin Battery project”
My email is cg8388@mhslive.net
Thank you, Camron
Hi Camron – you can just use the url for this project on this site as your source reference. The fingers you see in the experiment photos are mine and all the words in the article were written by me. Thanks!
Hi Dave, My name Is kyle. I need help with my science fair project. My project is a battery that makes cents. I need to know how nickles, pennies, dimes and quarters all conduct electricity.
Thank you, Kyle
Hi Kyle
Sorry, I see some of the links we had weren’t working after we moved this site to a WordPress format. I just fixed those. If you go to the “What just happened” section above and click on the Electricity Science Projects link and read that, then click on the lemon battery link and read the “what just happened” section there as well … I think you will have the answer you are looking for.
Hi – can you tell me when this was first published on your site? Thanks!
Hi Gina – This was performed and published late Nov 2008 … so it’s been on the site a while, but still works and still a great experiment to perform