
[wp_ad_camp_2]

http://veimages.gsfc.nasa.gov//2429/globe_west_2048.tif
First Grade Science Projects
Electricity is fascinating. It is also all around us. We wake by an alarm clock without thinking, then turn on a light and take a shower with hot water that we take for granted. Breakfast is cooked on an electric stove, or perhaps we selected frozen waffles that were kept that way by one use of electricity and warmed for eating by another. We plug in headphones to listen to our ipod on the way to work or school and the lightning bolt of a nearby thunderstorm may be just a mere distraction. It isn’t even something to think about it. It is just a part of our daily lives.
But what if we were to stop a moment and actually look at the world around us? Instead of just accepting that things “are” … could we figure out how things work instead? Could we capture interest long enough to bring a bit of wonder back into the normal everydayness of things? Bet we can, and that is exactly what this group of projects is all about. Given that the audience here is still quite young, most of these first grade science projects have been designed to be heavily supervised by the parent or teacher … but to be freely pondered upon by the young (or young at heart). Enjoy!
Turning on a Light Bulb
Objective
Come on – admit it. I know you’ve taken a flashlight apart, looked inside and tried to figure out why the light comes on when you push the button. I bet you’ve even looked at the bulb and wondered how that little thing can make so much light … right? Well, that is the objective here. This first grade science project is designed to help get young students wondering about how things work in the world around them, and then to answer some of those questions to keep them coming back for more. At the same time, it introduces a few concepts about electricity using everyday items they are already familiar with.
Materials
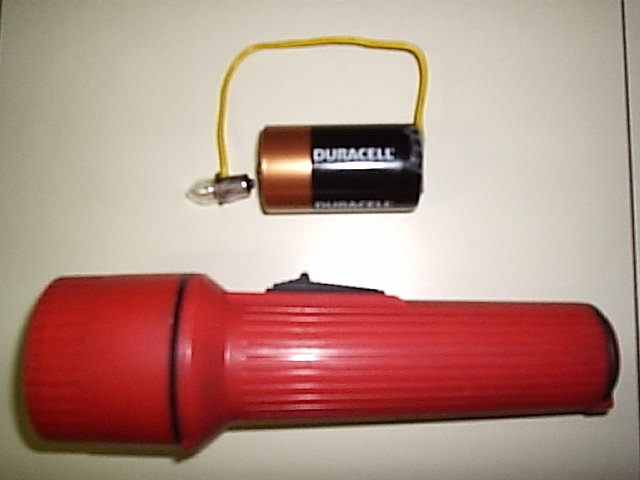
– 1 Standard size flashlight
– About 6 in. insulated wire, #12 or #18 works just fine
– 1 magnifying glass
– Small piece of sandpaper
– Pliers to make a loop in the wire (needle nose work best)
– Knife or wire pliers to remove insulation
Preparation
This first grade science project requires very little setup. Simply remove the bulb and one battery from the flashlight and you’re ready to go. If you want to minimize the time spent setting up in class, you can also strip about 1 inch of insulation from each end of the wire. Make a loop on one end of the wire just big enough to hold the bulb (see photo).
Project Day
Ask if any of the students have used a flashlight before. Almost every hand will probably go up, but let them give as many examples as they can of when they might need to use one. Then ask if anyone knows how a flashlight works. Chances are that nobody will raise their hand, so ask how many would like to learn, and let the fun begin.
You could break into a couple of first grade science project groups, but at this age, it is probably best to show them all in a single group and supervise while each that want to try can do so. Please be sure to set some project rules like the wire and battery are handled with care and only one person touches them at a time, etc.
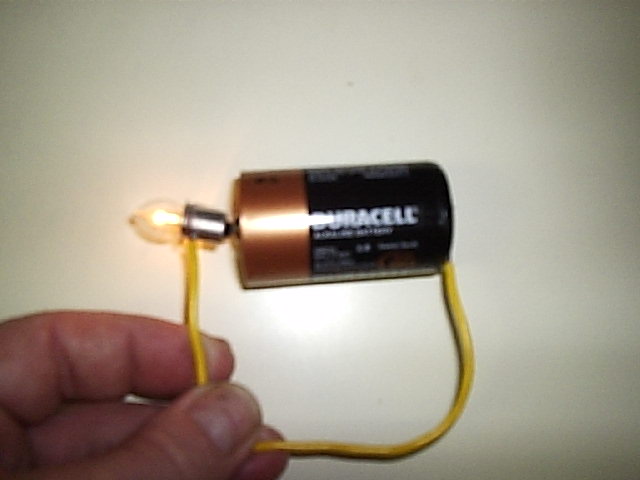
If you have not stripped about 1 inch of insulation off each end of the wire and made a small loop in one of the ends with a pair of pliers, do so now. Bend the wire as shown in the above photo and place the bulb in the loop.
Either tape or hold the straight end of the wire on one end of the battery with your thumb and touch the end of the light bulb to the other end of the battery as shown in the next photo. The light should shine. If it doesn’t, either the wire on the battery or the wire on the light is not making a good connection. Use the small piece of sand paper to clean the wire ends … and try again. If you are making a connection (and you are sure the flashlight worked before taking it apart), the light will shine.
Give the students some time to try this first grade science project themselves. Then as a whole group, demonstrate how to make the light work again and ask them what they think will happen if you take either end of the wire or light off the battery. (Part of the purpose for any first grade science project is to make a prediction, then test to see if it holds true).
 Take the end of the bulb off the battery. Does the light stay lit? No – it goes out. Tell them this is because an electric current only flows if there is no open space anywhere in our battery, wire and light. This is the same thing as saying current only flows in a complete circuit. When we break the circuit by taking one of the ends of the wire off the battery, (open space now), then current stops flowing and the light goes out.
Then take the bulb out of the wire loop and use the magnifying glass to show them the tiny filament of wire inside the light bulb.
After each has had a chance to see it, explain that when the current flows through that tiny wire, it gets very hot. As it gets hot it glows and that makes the light we see.
To shift the focus of this science project back to the flashlight itself, put the bulb and the battery back in the flashlight. When you turn it on and the light shines, tell them that the button or switch on the side is doing the exact same thing as we did when touched the wire end and the light to the two sides of the battery. The switch completes the electric circuit and current flows through that tiny wire in the light bulb called the filament. It gets hot, starts glowing and then lets off quite a bit of light for such a small object.
It is a bit early to discuss that the light bulb holds the filament in a vacuum so that it does not burn up as fast … but you can include that as well if time allows.
What just happened?
For the teacher – as discussed in Electricity Science Projects related to Charge, the battery provides a potential difference due to two disimiliar metals being immersed in a paste or fluid called an electrolyte. As chemical reactions at both the cathode (+ terminal) and the anode (- terminal) of the battery occur, ions flow through the electrolyte and electrons through the wire, as long as there is a complete circuit. (As an aside, fruit batteries like the lemon, apple or potato, as well as coin battery projects are great ways to focus on the battery itself).
In our experiment, if the light is not connected to one end of the battery and the wire end to the other, nothing happens because there is not a complete circuit for electrons to flow in, and therefore no current flows. When current does flow, the small filament inside the light bulb is a resistance in the circuit, and as current flows through it, it heats up. The type of wire used for the filament is specifically selected for the light it produces as well as how long it will work without burning out (which breaks the circuit and stops the current flow). To keep the filament from burning up too fast, the filament is also encased inside a container (usually glass), the air is pulled out of it and the resulting vacuum is sealed inside it during the manufacturing process.
For the students – as long as we have a complete circle for something called an electric current to flow around, the small wire inside the light bulb will glow. Whether we connect up the battery ourselves, or we put it all inside the plastic flashlight case, as soon as we make the complete circle (or circuit), the light will shine, at least for as long as the battery is good.
Summarize by answering the original question: Can we figure out how a flashlight works now?
And if you would rather try something a bit more “out of the box”, these might help …


[wp_ad_camp_2]